How to Zero a Thermal Scope: The Hand-Warmer Method Explained
By Peter Makulek · Senior Optics Editor · · Live prices from UK retailers
If you have ever mounted a thermal scope on your hog or coyote rifle, powered it on, and stared at a completely blank image where your carefully pinned paper target should be, you are not alone. Thermal optics detect radiated heat, not reflected light, so the conventional zeroing process that works perfectly for a daylight riflescope falls apart the moment you swap to thermal imaging. The thermal scope hand warmer zeroing method exists precisely to solve this problem, and once you understand the physics behind it, the technique is straightforward, repeatable, and costs less than a dollar per session.
For US hunters chasing hogs in South Texas brush or calling coyotes across open Oklahoma pasture at night, a solid thermal zero is not optional — it is the foundation of every ethical shot you will take in darkness. Most thermal-equipped predator and hog rifles are chambered in common US cartridges like .223 Remington, 6.5 Creedmoor, .308 Winchester, or .300 Blackout on AR-platform or bolt-action hosts. Regardless of caliber or platform, the zeroing principle is the same: you need a defined aiming point that your thermal sensor can actually resolve, and then you walk your point of impact onto it with your turrets exactly as you would with a day scope.
The challenge is that most thermal scopes on the US market — from entry-level units in the $1,500–$2,500 range up to premium sensors pushing $5,000 and beyond — have sensor resolutions between 320×240 and 640×512 pixels. That is dramatically lower than the human eye or even a budget daylight scope, which means a heat source needs to present a clean, high-contrast signature to serve as a usable aiming reference. Understanding this resolution limitation, and how ambient conditions affect heat contrast, is the difference between nailing a reliable zero and spending a frustrating evening chasing clicks.
This guide walks through the full thermal scope hand warmer zeroing method in detail, explains why the technique sometimes appears to fail (and how to fix every common failure mode), and covers purpose-built alternatives for shooters who want a more repeatable setup. Everything here applies equally whether you are running a clip-on thermal in front of a day scope or a dedicated standalone thermal riflescope, and whether your typical shot is 50 yards into a feeder or 200 yards across a sendero. The physics do not change — only the practical details of distance, turret math, and heat-source management.
Top Picks — Live UK Prices

ATN X-Celsior-NV 3-9x Day/Night Hunting Riflescope
via Uttings
£499.00

ATN X-Celsior-NV 5-15x Day/Night Hunting Riflescope
via Uttings
£549.00
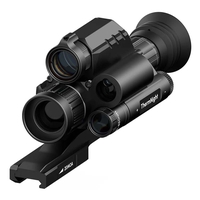
DNT Optics Thermnight Thermal (256x192) & Night Vision Multispectral Riflescope - 25mm with LRF
via Uttings
£999.99
Buying Advice
Understanding why you cannot zero a thermal scope on a normal paper target is the essential starting point. A standard printed paper or cardboard target sitting at ambient temperature radiates heat at almost exactly the same rate as its surroundings — the backstop, the target stand, and the air around it are all within a degree or two of each other. A thermal sensor builds its image from differences in radiated infrared energy, not from visible ink contrast, so a black bullseye on white paper that looks crisp to your eye is effectively invisible through the scope. The ink, the paper, the cardboard backer, and the dirt berm behind them are all the same temperature, producing a flat, featureless thermal image with no defined aiming point. This is why every thermal shooter needs an active heat source on the target.
The thermal scope hand warmer zeroing method is the most popular field solution because it is cheap, portable, and requires no electricity. The concept is simple: you take an ordinary chemical hand warmer — the air-activated iron-powder pouches sold at virtually every gas station, sporting goods store, and on Amazon for a few dollars per pack — and tape or clip it to the center of a standard paper or cardboard target at your intended zero distance. Once the hand warmer fully activates and reaches its operating temperature (typically 130–160°F), it radiates dramatically more infrared energy than the surrounding target material. Through your thermal scope, that hand warmer appears as a bright hot spot (in white-hot polarity) or a dark spot (in black-hot), giving you a defined aiming reference against a cooler background. You aim at the center of that heat signature, fire a group, and adjust your turrets to walk the impacts onto it — identical in logic to zeroing any conventional riflescope.
Knowing why the hand warmer method sometimes does not work is arguably more important than knowing the basic technique, because the three most common failure modes account for nearly every frustrated forum post on the subject. First, insufficient heat contrast: if the hand warmer has cooled down, is too small, or is mounted against a target board that has been baking in direct sun and is itself radiating significant heat, the temperature differential collapses and the heat signature blends into the background. The fix is to use a fresh, fully activated warmer and zero when the background is cooler — early morning, a shaded backstop, or after sunset. Second, wrong distance relative to sensor resolution: a hand warmer that reads as a tight, precise dot at 25 yards can become a fuzzy, ill-defined blob at 100 yards on a 320×240 sensor, making precise shot placement guesswork. Match your zeroing distance to your sensor's resolving ability and your realistic engagement range. Third, wind and ambient cooling: convective airflow across the hand warmer strips heat away faster than the chemical reaction replaces it, causing the signature to visibly shrink or fade during a session. Shielding the target from crosswind, or swapping in a fresh hand warmer partway through, solves this completely.
Following the correct step-by-step process eliminates most user error and produces a reliable, repeatable zero. Step one: mount the thermal scope securely and torque all mount and ring hardware to the manufacturer's specification — a loose mount will produce a wandering zero no matter how perfectly you manage the heat source. Step two: set up a standard paper or cardboard target at your intended zero distance, typically 50 to 100 yards for most predator and hog calibers. Step three: tape a fresh, air-activated hand warmer firmly to the target center and give it three to five minutes to reach full operating temperature before firing. Step four: fire a controlled three-shot group, aiming precisely at the center of the thermal signature. Step five: note where the group printed relative to the heat spot's center and calculate the necessary turret adjustment using your scope's click value — for example, if your scope adjusts in 0.1 MRAD clicks and your group is 5 cm left at 100 meters, you need 5 clicks right (since 0.1 MRAD equals 1 cm at 100 m). If your scope is calibrated in MOA, remember that 1 MOA is approximately 1.047 inches at 100 yards, and calculate accordingly. Step six: apply the correction, fire a fresh confirmation group, and verify the impacts now center on the heat signature. If the hand warmer has visibly dimmed by this point, replace it with a fresh one before the confirmation group.
Exploring alternatives to chemical hand warmers is worthwhile for shooters who zero frequently or want maximum consistency. Purpose-built thermal zeroing targets — sometimes called thermal zero boards or heat panels — are available from several manufacturers and consist of a resistive heating element behind a defined aiming pattern designed to produce a sharp, uniform thermal signature at known distances. These powered targets typically plug into a battery pack or vehicle outlet, maintain a consistent temperature regardless of wind, and present a crisper aiming point than a hand warmer, especially at longer ranges or with lower-resolution sensors. They range from moderately priced DIY-style resistor boards to professionally engineered panels costing several hundred dollars. Some shooters use rechargeable electric hand warmers (which maintain a steadier temperature than chemical pouches), small heat packs, or even hand-torched steel plates that retain heat briefly. All of these work on the same principle — creating a defined thermal contrast point — and the choice comes down to how often you zero, how much wind and distance variability you face, and your budget. For most US hunters who zero once or twice a season and hunt inside 150 yards, a two-dollar chemical hand warmer and a piece of cardboard remain perfectly adequate.
Frequently Asked Questions
Why can't I see a normal paper target through my thermal scope?
A thermal scope detects differences in radiated infrared energy, not visible light or ink contrast. A paper target, its printed bullseye, the cardboard backer, and the dirt berm behind it are all at roughly the same ambient temperature, so they emit nearly identical infrared radiation. To the thermal sensor, they all blend into one flat, featureless image with no discernible aiming point. You need an active heat source on the target to create the temperature differential the sensor requires.
What is the hand-warmer method for zeroing a thermal scope?
The thermal scope hand warmer zeroing method involves taping a fully activated chemical hand warmer to the center of a standard paper or cardboard target. The hand warmer radiates significantly more heat than the surrounding target material, creating a bright (or dark, depending on your color palette) spot visible through the thermal scope. You aim at the center of that heat signature, fire a group, and adjust your turrets to walk the point of impact onto the heat spot — exactly the same process as zeroing a conventional day scope, just with a heat-based aiming reference instead of an ink-based one.
Why does my hand-warmer target look too faint or disappear on thermal?
Three factors cause this. First, the hand warmer may have cooled past its peak output or may not have fully activated yet — give it three to five minutes after opening and use a fresh one. Second, if the target board has been sitting in direct sunlight, it may be nearly as warm as the hand warmer, collapsing the thermal contrast. Third, wind accelerates convective cooling and can strip heat from the warmer faster than the chemical reaction replaces it. Shield the target from wind and zero during cooler conditions for the best results.
How far away should I zero my thermal scope?
Most US predator and hog hunters zero their thermal scopes at 50 to 100 yards, matching the typical engagement distances for night hunting over feeders, senderos, or called-in coyotes. Your specific zero distance should reflect your caliber's trajectory and your realistic shooting range. Keep in mind that lower-resolution thermal sensors (320×240) may struggle to resolve a hand warmer's heat signature into a precise aiming point much beyond 75–100 yards, so if your sensor has limited resolution, zero at a distance where the heat spot is still sharp and well-defined.
Do I need a special thermal zeroing target instead of a hand warmer?
You do not strictly need one, but purpose-built thermal zeroing targets offer advantages. They maintain a consistent, controllable temperature regardless of wind, present a sharper defined aiming point than a chemical pouch, and are reusable across many sessions. For hunters who zero once or twice a season at moderate distances, a chemical hand warmer is perfectly adequate. Shooters who zero frequently, need precision at longer ranges, or deal with windy conditions regularly may find a dedicated thermal target panel worth the investment.
Can I use an electric rechargeable hand warmer instead of a chemical one?
Yes, and electric hand warmers actually offer a more consistent heat output because they maintain a steady temperature rather than gradually cooling like a chemical pouch. Their sustained output makes them especially useful on windy days or during longer zeroing sessions. The main considerations are that they tend to be physically larger than chemical pouches and you need to ensure the one you choose reaches a temperature high enough to produce clear thermal contrast at your intended zeroing distance.
Does the color palette setting on my thermal scope matter when zeroing with a hand warmer?
The color palette (white-hot, black-hot, various color modes) changes how the heat signature appears visually but does not affect your ability to zero. In white-hot mode the hand warmer will appear as a bright white spot; in black-hot it will appear dark. Most experienced thermal shooters prefer white-hot or black-hot for zeroing because these high-contrast monochrome palettes make it easiest to identify the precise center of the heat signature. Use whichever palette you find gives you the clearest, most well-defined aiming point.
Should I zero my thermal scope during the day or at night?
Zeroing during early morning, late evening, or after dark generally produces the best results because ambient temperatures are lower and background objects are cooler, maximizing the thermal contrast between the hand warmer and its surroundings. If you must zero during the day, choose a shaded backstop and avoid leaving the target board in direct sunlight, which heats the board and reduces the temperature differential. The scope's mechanical zero does not change between day and night — what changes is your ability to clearly see the heat-based aiming point.
How many MOA or MRAD clicks should I adjust per shot group?
Calculate your adjustment the same way you would with any riflescope. Measure the distance between your group center and the center of the heat signature, then divide by the scope's per-click value at your zeroing distance. For a scope with 0.25 MOA clicks at 100 yards, each click moves the point of impact roughly 0.26 inches. For a 0.1 MRAD scope at 100 meters, each click moves the impact 1 centimeter. Apply the calculated number of clicks in the correct direction, fire a confirmation group, and verify.
Related guides
Find the best clip-on thermal imager for your day scope in 2026. We cover mounting, detection range, realistic price tiers, and top picks for US hunters and shooters.
Thermal vs Night Vision: Which Should You Buy First?Thermal vs night vision — which to buy first in 2026? Our US-focused decision guide breaks down detection vs identification, real price tiers, and the best pick for your use case.
Pulsar vs Hikmicro: Which Thermal Scope Suits UK Shooters?Pulsar or Hikmicro thermal scope for UK shooting in 2026? Our in-depth comparison covers specs, budget tiers, deer stalking, fox control and rabbit shooting to help you choose the best thermal rifle scope.
Best Budget Thermal Scopes for Fox & Deer Shooting in the UKOur 2026 UK buyer's guide to the best thermal scopes under £500 for foxing and deer stalking. Compare PARD, Hikmicro and more — specs, legality and real-world advice.
Best Budget Thermal Scopes Under £1,000 (UK 2026)Our expert guide to the best budget thermal scopes under £1,000 for UK fox and vermin shooting in 2026. Compare Pard, Hikmicro and Pulsar on resolution, refresh rate and value.
Best Scopes for 6mm ARC in 2026Find the best scope for 6mm ARC in 2026. Expert picks across budget, mid-tier, and premium price bands for PRS, NRL, and precision AR-15 shooting in the US.
1-Piece Scope Mounts for PRS & Long-Range: What Actually MattersChoosing a 1-piece scope mount for PRS or long-range competition? Our 2026 guide covers return-to-zero, torque specs, tube diameter matching, and the top-tier brands US shooters trust.
Not sure which scope is right for you?
Try our AI-powered scope finder — answer a few questions and get personalised recommendations.
Find My Scope →Get a UK scope tip every day
Follow AiScopes on Facebook for daily buying guides, deals and gear advice.
Follow on Facebook